 |
| Christmas Popups with Falling snow & Countdown Timer! |
Showing posts with label Widgets. Show all posts
Showing posts with label Widgets. Show all posts
Monday, 1 September 2014
Christmas Popups with Falling snow & Countdown Timer!
17 Best 'Label' and 'Feed' Search Techniques in Blogger
 |
| 17 Best 'Label' and 'Feed' Search Techniques in Blogger |
In wordpress we call labels as Categories and sub categories as Tags but
Saturday, 30 August 2014
Details of Mohammad's Nationwide Interview On Radio FM 94
 |
| Nationwide Interview On Radio FM 94 |
These are very useful tips that everyone should read!
Introduction
Some of out dedicated readers might know our story already, But for
others, this blog was started by Mohammad back in 2008 with a motivation
to share tutorials on Blogger with other Blogger users. Over
Fancy Ribbon Backgrounds For Blogger Sidebars!
|
| Fancy Ribbon Backgrounds For Blogger Sidebars |
Thursday, 29 May 2014
Display Post Views Count in Blogger - New!
Display Post Views Count in Blogger - New!
 Yes you heard it right, all BlogSpot blogs will now be able to display a dynamic count for individual pageviews. We can now easily create this post view counter without worrying about servers or server code. With a free service like Firebase you can now create dynamic and data-driven plugins for blogger without worrying about backend development. Firebase was launched in April 2012 and since then it had been the hub for developers. Amazingly this free plan gives you 10GB Free bandwidth and 5GB Free storage. Which in our case is more than required! We had been lucky to utilize this free service for blogger platform and create some amazing scripts with the help of our developer Ahmed Nasir. Today's tutorial will help you to install a dynamic script that will automatically increment its initial count value when a visitor views your blog posts. The counter data will be stored on a free database provided by Firebase. Lets first see a demo!
1. Create your Firebase Account
In order to gain access to a free database and be able to keep a backup of your postviews counter data, you must sign up for a free account at Firebase.Fill up the easy steps sensibly and then once your account has been activated, you must create your first Firebase database.
2. Create a Firebase Database
You can create 2 firebases. At present just create one, we will guide you later in coming posts about amazing things you can play with this free service.- Towards the bottom right side of your account, you will find the following submit box.

2. Inside this box input your website name. In my case I inserted mybloggertricks and this generated the following firebase URL: https://mybloggertricks.firebaseio.com
3. Finally hit the create button and note down your firebase URL because we would need it later in this tutorial.
3. Installing Postviews Plugin
- Go To Blogger > Template
- Backup your template
- Click Edit HTML
- Tick the box "Expand widget Templates"
- Search for ]]></b:skin>
- Just above it paste the following CSS code:
/*-------- Post Views ----------*/Customizations:
#views-container {
width: 85px;
float: right;
}
.mbtloading {
background: url('https://blogger.googleusercontent.com/img/b/R29vZ2xl/AVvXsEgt3jdMzl8zqq3qZEyiMLBxZNLZHy-3DXTAHtW0QpxzyFXlTOr4Kn4tb9NhZPCD60Y_U7s5eBK4Dk76yyjP73kCq5XRpBMWQqGUS-ImQQhViQd4GktrrnbmX7c0LWGH0_eKrRN_jVKW47eS/s320/mbtloading.gif') no-repeat left center;
width: 16px;
height: 16px;
}
.viewscount {
float: right;
color: #EE5D06;
font: bold italic 14px arial;
}
.views-text {
float: left;
font: bold 12px arial;
color: #333;
}
.views-icon{
background: url('https://blogger.googleusercontent.com/img/b/R29vZ2xl/AVvXsEglPHwdZ3XMWEQcFgGzjEBlVNYHTZUpg4Yk6gfOFtHEMjRsnk_IzejmTKL9Lloo8Z9pkqPZftS5yFikwNyKoj6r0VzYzBVeqotiEADO58Dao6nLuZtoMdwdpYkYhMqupB-2S0WKNGo3ihWv/s1600/postviews.png') no-repeat left;
border: 0px;
display: block;
width: 16px;
height: 16px;
float: left;
padding: 0px 2px;
}
- To change the text color of the numeric count, edit #EE5D06
- To change the plugin alignment, change right to left.
<!-- Post Views Script by MBT -->Make this change:
<script type='text/javascript'>
window.setTimeout(function() {
document.body.className = document.body.className.replace('loading', '');
}, 10);
</script>
<script src='https://cdn.firebase.com/v0/firebase.js' type='text/javascript'/>
<script>
$.each($('a[name]'), function(i, e) {
var elem = $(e).parent().find('#postviews').addClass('mbtloading');
var blogStats = new Firebase("https://mybloggertricks.firebaseio.com/pages/id/" + $(e).attr('name'));
blogStats.once('value', function(snapshot) {
var data = snapshot.val();
var isnew = false;
if(data == null) {
data= {};
data.value = 0;
data.url = window.location.href;
data.id = $(e).attr('name');
isnew = true;
}
elem.removeClass('mbtloading').text(data.value);
data.value++;
if(window.location.pathname!='/')
{
if(isnew)
blogStats.set(data);
else
blogStats.child('value').set(data.value);
}
});
});
</script>
- Replace the highlighted brown line with your firebase URL (Step#2). Make sure you replace it correctly by taking care of forward slash (/)
<data:post.body/>Note: If you are finding multi occurrences of the same code then choose the first occurrence.
9. Just above it paste the following HTML,
<!-- Post Views Counter by MBT-->You can replace views: with any text you like.
<div id='views-container'><span class='views-icon'/><div class='views-text'>Views:</div> <div class='mbtloading viewscount' id='postviews'/></div>
10. Now the final step, paste the following jquery link just below <head>
<script src='http://ajax.googleapis.com/ajax/libs/jquery/1/jquery.min.js' type='text/javascript'></script>
11. Hit save and you are all done!
Visit your blog and press F5 (refresh page) to see the counts dancing just perfectly! :)
Copyrights
Developers and niche bloggers are most welcome to share this Plugin with their readers and friends. Please attribute the credits back to MBT blog as the only favor in return. It takes hours of efforts to write and debug these scripts. This plugin comes under a Creative Commons Attribution-NonCommercial-NoDerivs 3.0 Unported License.
Need help?
We just hope this plugin adds new fuel to your blogger powered blogs. We tried best to keep it working as efficient as possible. You wont run out of bandwidth as long as you create your own Firebase accounts and not use ours (our firebase url).
This plugin will display views only once pages are visited. It is not synchronized with your Google analytics stats data, therefore it will only display correct views for the new posts that you publish.
Let me know if you needed any help. We have some more interesting scripts coming up this week. Stay tuned! Peace and blessings buddies :)
Don't forget to try:Installing Zemanta on Blogger - A New Way to create Blog Posts!
Installing Zemanta on Blogger - A New Way to create Blog Posts!

Creating quality content is a major concern for bloggers. It is one thing to establish a good-looking and well-optimized website which is SEO friendly, and quite another to update it with fresh, regular content which is of high quality. No matter how well a site is optimized for search engines, content still remains the king, and Google regards content more highly, since it is oriented towards the users more. Creating quality content, and adding value to it isn't an easy job. But don't worry! People who use Google Blogger now have access to an amazing tool, Zemanta, which will help them create quality content, and spice it up with images, links, and more!
UPDATE: If you are not well versed with SEO then we don't recommend that you may use this tool. Please read the following tutorial to know why:
UPDATE: If you are not well versed with SEO then we don't recommend that you may use this tool. Please read the following tutorial to know why:
What makes a great blog post?
When people ask me how they can create 'quality blog posts', I usually tell them to first overview their own posts from an outsider's perspective. Forget the person who wrote the post, and become the person who'd love to find anything wrong with the post so that he could fire the guy who wrote it. This kind of self-criticism often proves to be constructive, and makes you see your posts in a better light.
Now the writing part of the blog post itself cannot be imposed on anyone, because not everybody has the knack for writing proficiently, not at the start anyway. So instead, we advise people to focus on the visuals. When you take a glance at a blog post, you generally analyze the structure of the content. One of the most important thing to consider here is visual aids. Adding images can be the key to any post's success, since they add colors and graphics which attract readers.
Besides images, there are a few more things that matter within a blog post, such as authority links, further resources, and so on. In other words, working on building trust. Well, as it turns out, this sort of work is right up Zemanta's alley.
Zemanta?
Zemanta is a free editorial service that will help you build upon your blog post, and add more value to it by helping with images, tags, links, and more. It has just been integrated with Blogger, so Blogger users can easily use this to improve the quality of their blog posts!
Zemanta can help you with;
- Images - This is a real time-saver! While you are writing your post, you can see image suggestions appear right on your sidebar. You can choose them at any post, and insert them into your post with a single click! Additionally, you can quickly insert your Instagram and Flickr photos too.

- Tags - With Zemanta, you can easily tag your posts with Labels. Zemanta will make the process much easier, and bring your site closer to search engines as well.
- In-text links - This is another perk I was really looking forward to. Zemanta will automatically (or to quote Zemanta, "automagically") link keywords to relevant sources. This will hopefully help readers who aren't clear about a term, and want to find out more about it.

- Related Articles - Here's another potential gold mine. You can use this tool to link to your old articles, as well as to link to articles from the blogosphere. This way, you will relate to posts from other bloggers, and other bloggers will relate to posts from you. Hence, an effective linking scheme that could benefit both parties.
How to get Zemanta?
Zemanta is pretty easy to install. And since it's free, there's no hassle about it. Best of all, it is available for most popular browsers, since it is a browser extension. You can get this plugin from its host website. Simply click on the browser icon that you use, and follow the on-screen instructions.
For example, to install to Chrome, simply follow this download link. Click on the Add to Chrome button at the top, and this extension will be installed in seconds! Similarly, for FireFox, all you need to do is go to the download site, and click on Continue to download. The extension will then take no time to download and install!
Pretty cool, huh? This plugin could really save time, and help with productivity. What do you guys think? Leave your interesting responses below. Peace :)
Add AdSense right After <!--More--> Tag
Add AdSense right After <!--More--> Tag
 This is a great tutorial which will multiply your current click through rate and add a new boom to your over all Adsense earning. With a big repository of plugins for Wordpress blogs like Quick Adsense, WP users never need to worry while adding Adsense to any part of the blog they wish but in blogger we lack plugins that could do the job automatically. Therefore this week my main focus lies in developing more of such plugins that could provide you great front end experience. Thanks our developer Ahmed Nasir the script developed this time will automatically insert your AdSense Ad right after the opening paragraph (Post summary) or the read more button(Jump Break). The read more link is distinguished by the HTML tag "<!--more-->" , we will use a simple Jquery code to tell the browser to append an Ad zone with a unique div ID, right before the more tag. In browsers where JavaScript is disabled the Ad zone will instead display at the end of post. You can see the demo on our blog, right after reading this line...
(You will see below a 468X60 Adsense for content Ad).
Update: I have disabled the Ad display for browsers where JavaScript is disabled.
Installing the Script on Blogger
- Go to Blogger > Templates
- Backup your template
- Tick the "Expand Widget Templates" box
- Search for <head>
- Just below it paste the following JQuery code only if you are not yet using jQuery script on your blog
<script src='http://ajax.googleapis.com/ajax/libs/jquery/1/jquery.min.js' type='text/javascript'/>6. Next paste the following code below <head>
<script type='text/javascript'>Optional: If you want to display the ad at two places i.e. below read more tag and also at the end of post then delete the highlighted yellow code. Also delete the yellow highlighted code from step#8 given below
$(document).ready(function(){
$('a[name="more"]').before($('#MBT-google-ad').html());
$('#MBT-google-ad').html('');
});
</script>
7. Now search the following code:
<data:post.body/>8. Just below it paste the following code:
<b:if cond='data:blog.pageType == "item"'>Replace the bolded text above with your Adsense code. Remember that the code that you copy from your Google Adsense Account must be first encoded inorder to work with blogger templates. Simply copy the code and then encode it using the following MBT tool.
<div style="display:none;">
<div id='MBT-google-ad'>
<br/>
<center>
ADD ENCODED ADSENSE CODE HERE </center>
<br/>
</div>
</div> </b:if>
- Encode your AdSense code using: MBT HTML Encoder
9. Save your template and you are all done!
Visit your blog and then visit any post page, you will see an Ad hanging just perfectly right after the first opening Summary paragraph. :)
Need Help?
I am always open to curious and delicious questions so never hesitate asking for help. If your blog has no Read more functionality or you don't know how to add a a jump break then you can try these interesting tutorials:- Add a read more link to blogger
- Remove blogger Jump Break
- 10 Ways to Create Read More buttons
Download counter : A Plugin for blogs!
Download counter : A Plugin for blogs!
 This is the first plugin of its kind created for websites which share downloadable resources. The plugin amazingly works with all major blogging platforms like wordpress and blogger blogs. It can even be used in static Sites or any CMS you may be using. This tool will count and display download stats whenever a visitor downloads a resource form your site. The data is stored at your firebase free account. Luckily we are amongst very few who have started developing tools using the newly introduced Firebase system that allows developers to create dynamic and data-driven tools without worrying about backend development. You do not need to worry about server code or managing databases, firebase does it all for free. All you need is to code some delicious scripts that does half the work. This plugin is a custom alternative to Dstats download tracking service. Lets add this amazing tool to your blogger blogs!
The following link will take you to our first plugin created with Firebase.
- Read: Display Post Views in blogger
1. Create your Firebase Account *
To store your data for downloads, you will first sign up for a free account at Firebase.- Click here to sign up now!
2. Create a Firebase Database
Previously you could only create 2 firebases but now you can create a total 5! So create one for your download stats data- Towards the bottom right side of your account, you will find the following submit box.

2. Give your firebase a short name. In my case I named it mbtblogstats. This name will be used as your unique Identification.
3. Hit create and note down your firebase URL because we would need it later in this tutorial.
Installing Download Counter Plugin:
The steps below are for blogspot blogs. Wordpress users may simply note down the method and apply accordingly on their WP powered blogs.- Go To Blogger > Template
- Backup your template
- Click Edit HTML
- *Search for </b:skin>. Click the black arrow to expand the code.

5. Paste the following Styles just above </b:skin>
/*----- download counter by MBT-----*/
.mbtloading {
background: url('https://blogger.googleusercontent.com/img/b/R29vZ2xl/AVvXsEgt3jdMzl8zqq3qZEyiMLBxZNLZHy-3DXTAHtW0QpxzyFXlTOr4Kn4tb9NhZPCD60Y_U7s5eBK4Dk76yyjP73kCq5XRpBMWQqGUS-ImQQhViQd4GktrrnbmX7c0LWGH0_eKrRN_jVKW47eS/s320/mbtloading.gif') no-repeat left center;
width: 16px;
height: 16px;
}
.blog-stats {
color: #289728;
font: bold italic 18px georgia, arial;
float: right;
}
You can easily change the color and size of the Numeric Text count by editing #289728
Tip: Use our color generator Tool to pick a color of your choice
6. Now search </body> and just above it paste the following script:
<!-- Download Counter by MBT starts-->
<script type='text/javascript'>
window.setTimeout(function() {
document.body.className = document.body.className.replace('loading', '');
}, 10);
</script>
<script src='https://cdn.firebase.com/v0/firebase.js' type='text/javascript'/>
<script>
$.each($('[data-download-count=true]'), function (i, e) {
var elem = $(e).parent().find('#download-count').addClass('mbtloading');
var id = $(e).closest('.post-body').siblings('a[name]').attr('name') + "-" + $(e).attr('id');
var downloadStats = new Firebase("https://mbtblogstats.firebaseio.com/downloads/id/" + id);
var data = {}, isnew = false;
downloadStats.once('value', function (snapshot) {
data = snapshot.val();
if (data == null) {
data = {};
data.value = 0;
data.url = window.location.href;
data.id = id;
isnew = true;
}
elem.removeClass('mbtloading').text(data.value);
});
$(e).click(function (e) {
data.value++;
if (isnew) downloadStats.set(data);
else downloadStats.child('value').set(data.value);
});
});
//<![CDATA[
$(document).ready(function () {
//checks if the number of posts on this page are more than one then return.
if($('.post-outer').length > 1)
return;
//selects the element to be made sticky.
var stickElement = $('.date-header'),
//selects the element which would trigger the sticky elem to go away
hideTrigger = $('#comments'),
//class name to be added (it should match the class in CSS)
fixed = "fixed",
top = stickElement.offset().top;
$(window).scroll(function (event) {
var y = $(this).scrollTop();
var maxY = hideTrigger.offset().top;
if (y >= top && y < maxY) {
stickElement.addClass(fixed);
} else {
stickElement.removeClass(fixed);
}
});
});
//]]>
</script>
<!-- Download Counter by MBT Ends-->
Replace mbtblogstats with your Firebase name that you created in step#2.
7. * Now search for <head> and paste the following JQuery library just below <head>
<script src='http://ajax.googleapis.com/ajax/libs/jquery/1/jquery.min.js' type='text/javascript'></script>
You may not add the jquery code if you have already linked to Jquery library in your blog.
8. Save your blog and you are all done with coding!
Displaying Download stats in Posts
Now whenever you wish to display download stats for a particular file. Simple link to your file using the code below:<div style="width:120px;">
<a data-download-count="true" href="#">Download Now!</a>
<div class="blog-stats" id="download-count">
</div>
</div>
- Replace the # sign with your File link.
- You can write anything instead of Download Now! If your link is bigger in length then increase the width of the counter so that it shows the count in alignment.
Need Help?
I just hope this new plugin proves helpful for blogger users who are missing a database access. I am sure this plugin is the second best use of FireBase which is indeed a magic hub for developers. I would really appreciate you to use it for your projects. Please ask me any query you may have and feel free to share your precious views. Have fun buddies. Peace and blessings be upon you all always. :)Note: all questions will links will be deleted no matter how important the question be. Avoid Spamming please.
Popular Posts With Automatic Numbering - Bubbles!
Popular Posts With Automatic Numbering - Bubbles!
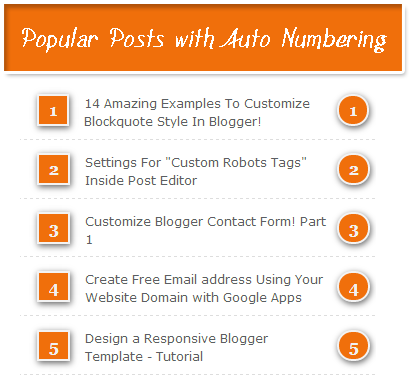
When blogger released Popular Posts widget back in 2011, we leaked out its stylesheet so that you can customize it to blend it perfectly to your BlogSpot templates. Today we will learn how to display the list of popular posts using CSS3 auto increment property. You can style the numbers in variety of shapes, we styled them in square/rectangular and circular shape. you guys were the first to display threaded comments with Comment Counts and today you will again learn something more interesting. You can see a practical demo of this implementation on our sidebar. Lets add this effect to blogger in fairly easy steps using pure styles with no use of JavaScript.
Popular posts widget is an effective tool to increase your blog pageviews and engage readers more on your blog. It fetches and ranks posts based on most visited pages using your Google analytics data. Add Popular Posts Widget
- Go to Blogger > Layout
- Click "Add a Gadget"
- Choose "Popular Posts" from the list
- You will need to configure its settings as shown in the image below: uncheck "image thumbnail" and also "snippet" Its better that you display at most 7-9 posts. Less is good and clean.

5. Save it
Customize Popular Posts Plugin
Now you need to change the default styles and change its look to our desired design using Custom styles.- Go To Blogger > Template
- Backup your Template
- Click Edit HTML
- Search for </b:skin>. Click the black arrow to expand the code.
5. Paste the following Styles just above </b:skin>
/*--- MBT Popular Posts --- */Customization:
.popular-posts ul {
padding-left: 0px;
counter-reset: popcount;
}
.popular-posts ul li:before {
list-style-type: none;
margin-right: 15px;
padding: 0.3em 0.6em;
counter-increment: popcount;
content: counter(popcount);
font-size: 16px;
background: #292D30;
color: #ffffff;
position: relative;
font-weight: bold;
font-family: georgia;
float: left;
border: 2px solid #dddddd;
box-shadow: 1px 2px 9px #666666; }
.popular-posts ul li {
border-bottom: 1px dashed #dddddd;
}
.popular-posts ul li:hover {
border-bottom: 1px dashed #696969;
}
.popular-posts ul li a {
text-decoration:none; color:#5A5F63;
}
.popular-posts ul li a:hover {
text-decoration:none;
}
- To change the background color of the Square bubble edit #292D30
- To change the text color of the bubble edit #ffffff
- By default the shape of the bubble is Square. To change it to Circle simply add the following code just after box-shadow: 1px 2px 9px #666666;
border-radius:15px;
6. Save your template and you are all done!
Visit your blog to see it working just perfectly.
If you would wish to add it inside a Multi Tab Widget just like we have done on our blog, then you can find several tutorials on our blog that were released years ago on Multi Tabs. Please read one below:
- Install a Switchable Multi Tab Widget
Need Help?
I just hope you would find this tutorial easy and yet exciting. Please let me know if you need any help. I just hope you continue adding more colors and flavors to your beautiful blogs. Wish you success and peace buddies. :)Create Accordion Widget in Blogger
Create Accordion Widget in Blogger
 Update: The Script has been updated and it will work just perfect!
It is really important to organize your content and make certain sections of your blog to appear only when the visitor is interested in it. We are using an Accordion Widget that you can find at the footer of our blog in order to display a list of Popular Series. Its an effective way for us to display long list of links in a neat and clean way. I created this widget using JQuery and the Easing Plugin. This Accordion widget is a modified version of the Fresh content Accordion released by Martin Angelov in 2009. We customized its stylesheet and edit some parts of the scripts to make it compatible with blogger blogs. It has a great Expand/Collapse Feature. This widget collapses and hides all content inside it by default but when user clicks it, the content is displayed by expanding that tab section. I am sure you would love to add this Fancy Accordion widget to your BlogSpot blogs.
Need Demo? Check the footer of our blog! Click Here
Design a Fancy Accordion For Blogger!
Just follow this step by step easy tutorial. You don't need to worry about browser compatibility issues because we have done all that work for you. The widget is compatible with all major browsers including IE8+.Follow these steps:
- Go To Blogger > Template
- Backup your template
- Click Edit HTML
- Search for </head>
- Just above it paste the following code
<script src='http://ajax.googleapis.com/ajax/libs/jquery/1/jquery.min.js' type='text/javascript'></script>Note: The yellow highlighted code is for producing the bouncing effect using the Easing Plugin. If you don't want too much animation then you can delete the yellow part of the code.
<script>
//<![CDATA[
$(document).ready(function(){
/* This code is executed after the DOM has been completely loaded */
/* Changing thedefault easing effect - will affect the slideUp/slideDown methods: */
$.easing.def = "easeOutBounce";
/* Binding a click event handler to the links: */
$('li.button a').click(function(e){
/* Finding the drop down list that corresponds to the current section: */
var dropDown = $(this).parent().next();
/* Closing all other drop down sections, except the current one */
$('.dropdown1').not(dropDown).slideUp('slow');
dropDown.stop(false,true).slideToggle('slow');
/* Preventing the default event (which would be to navigate the browser to the link's address) */
e.preventDefault();
})
});
// t: current time, b: begInnIng value, c: change In value, d: duration
jQuery.easing['jswing'] = jQuery.easing['swing'];
jQuery.extend( jQuery.easing,
{
def: 'easeOutQuad',
swing: function (x, t, b, c, d) {
//alert(jQuery.easing.default);
return jQuery.easing[jQuery.easing.def](x, t, b, c, d);
},
easeInQuad: function (x, t, b, c, d) {
return c*(t/=d)*t + b;
},
easeOutQuad: function (x, t, b, c, d) {
return -c *(t/=d)*(t-2) + b;
},
easeInOutQuad: function (x, t, b, c, d) {
if ((t/=d/2) < 1) return c/2*t*t + b;
return -c/2 * ((--t)*(t-2) - 1) + b;
},
easeInCubic: function (x, t, b, c, d) {
return c*(t/=d)*t*t + b;
},
easeOutCubic: function (x, t, b, c, d) {
return c*((t=t/d-1)*t*t + 1) + b;
},
easeInOutCubic: function (x, t, b, c, d) {
if ((t/=d/2) < 1) return c/2*t*t*t + b;
return c/2*((t-=2)*t*t + 2) + b;
},
easeInQuart: function (x, t, b, c, d) {
return c*(t/=d)*t*t*t + b;
},
easeOutQuart: function (x, t, b, c, d) {
return -c * ((t=t/d-1)*t*t*t - 1) + b;
},
easeInOutQuart: function (x, t, b, c, d) {
if ((t/=d/2) < 1) return c/2*t*t*t*t + b;
return -c/2 * ((t-=2)*t*t*t - 2) + b;
},
easeInQuint: function (x, t, b, c, d) {
return c*(t/=d)*t*t*t*t + b;
},
easeOutQuint: function (x, t, b, c, d) {
return c*((t=t/d-1)*t*t*t*t + 1) + b;
},
easeInOutQuint: function (x, t, b, c, d) {
if ((t/=d/2) < 1) return c/2*t*t*t*t*t + b;
return c/2*((t-=2)*t*t*t*t + 2) + b;
},
easeInSine: function (x, t, b, c, d) {
return -c * Math.cos(t/d * (Math.PI/2)) + c + b;
},
easeOutSine: function (x, t, b, c, d) {
return c * Math.sin(t/d * (Math.PI/2)) + b;
},
easeInOutSine: function (x, t, b, c, d) {
return -c/2 * (Math.cos(Math.PI*t/d) - 1) + b;
},
easeInExpo: function (x, t, b, c, d) {
return (t==0) ? b : c * Math.pow(2, 10 * (t/d - 1)) + b;
},
easeOutExpo: function (x, t, b, c, d) {
return (t==d) ? b+c : c * (-Math.pow(2, -10 * t/d) + 1) + b;
},
easeInOutExpo: function (x, t, b, c, d) {
if (t==0) return b;
if (t==d) return b+c;
if ((t/=d/2) < 1) return c/2 * Math.pow(2, 10 * (t - 1)) + b;
return c/2 * (-Math.pow(2, -10 * --t) + 2) + b;
},
easeInCirc: function (x, t, b, c, d) {
return -c * (Math.sqrt(1 - (t/=d)*t) - 1) + b;
},
easeOutCirc: function (x, t, b, c, d) {
return c * Math.sqrt(1 - (t=t/d-1)*t) + b;
},
easeInOutCirc: function (x, t, b, c, d) {
if ((t/=d/2) < 1) return -c/2 * (Math.sqrt(1 - t*t) - 1) + b;
return c/2 * (Math.sqrt(1 - (t-=2)*t) + 1) + b;
},
easeInElastic: function (x, t, b, c, d) {
var s=1.70158;var p=0;var a=c;
if (t==0) return b; if ((t/=d)==1) return b+c; if (!p) p=d*.3;
if (a < Math.abs(c)) { a=c; var s=p/4; }
else var s = p/(2*Math.PI) * Math.asin (c/a);
return -(a*Math.pow(2,10*(t-=1)) * Math.sin( (t*d-s)*(2*Math.PI)/p )) + b;
},
easeOutElastic: function (x, t, b, c, d) {
var s=1.70158;var p=0;var a=c;
if (t==0) return b; if ((t/=d)==1) return b+c; if (!p) p=d*.3;
if (a < Math.abs(c)) { a=c; var s=p/4; }
else var s = p/(2*Math.PI) * Math.asin (c/a);
return a*Math.pow(2,-10*t) * Math.sin( (t*d-s)*(2*Math.PI)/p ) + c + b;
},
easeInOutElastic: function (x, t, b, c, d) {
var s=1.70158;var p=0;var a=c;
if (t==0) return b; if ((t/=d/2)==2) return b+c; if (!p) p=d*(.3*1.5);
if (a < Math.abs(c)) { a=c; var s=p/4; }
else var s = p/(2*Math.PI) * Math.asin (c/a);
if (t < 1) return -.5*(a*Math.pow(2,10*(t-=1)) * Math.sin( (t*d-s)*(2*Math.PI)/p )) + b;
return a*Math.pow(2,-10*(t-=1)) * Math.sin( (t*d-s)*(2*Math.PI)/p )*.5 + c + b;
},
easeInBack: function (x, t, b, c, d, s) {
if (s == undefined) s = 1.70158;
return c*(t/=d)*t*((s+1)*t - s) + b;
},
easeOutBack: function (x, t, b, c, d, s) {
if (s == undefined) s = 1.70158;
return c*((t=t/d-1)*t*((s+1)*t + s) + 1) + b;
},
easeInOutBack: function (x, t, b, c, d, s) {
if (s == undefined) s = 1.70158;
if ((t/=d/2) < 1) return c/2*(t*t*(((s*=(1.525))+1)*t - s)) + b;
return c/2*((t-=2)*t*(((s*=(1.525))+1)*t + s) + 2) + b;
},
easeInBounce: function (x, t, b, c, d) {
return c - jQuery.easing.easeOutBounce (x, d-t, 0, c, d) + b;
},
easeOutBounce: function (x, t, b, c, d) {
if ((t/=d) < (1/2.75)) {
return c*(7.5625*t*t) + b;
} else if (t < (2/2.75)) {
return c*(7.5625*(t-=(1.5/2.75))*t + .75) + b;
} else if (t < (2.5/2.75)) {
return c*(7.5625*(t-=(2.25/2.75))*t + .9375) + b;
} else {
return c*(7.5625*(t-=(2.625/2.75))*t + .984375) + b;
}
},
easeInOutBounce: function (x, t, b, c, d) {
if (t < d/2) return jQuery.easing.easeInBounce (x, t*2, 0, c, d) * .5 + b;
return jQuery.easing.easeOutBounce (x, t*2-d, 0, c, d) * .5 + c*.5 + b;
}
}); //]]>
</script>
6. Search for </b:skin>. Click the black arrow to expand the code.
7. Paste the following CSS Styles just above </b:skin>
/*------ Accordion Widget by MBT -----*/Note: The look and colors of the links and fonts can be customized by editing the above the code. But the default colors would work fine with any dark footer except if your footer has white background.
ul.container{
width:275px;
margin:0 auto;
padding:0px;
}
li.menu{
padding:5px 0;
width:100%;
}
li.button a{
display:block;
font-family: Arial, sans-serif,Helvetica;
font-size:12px;
overflow:hidden;
padding:0px 0px 5px 0;
position:relative;
width:100%;
text-transform:capitalize;
}
li.button a:hover{
text-decoration:none!important;
}
li.button a span{
right:0px;
top:0px;
position:absolute;
color:#ccc;
display:block;
}
.dropdown1{
display:none;
padding-top:5px;
width:100%;
}
.dropdown1 li{
border:1px solid #7E7E7E;
color:#CCCCCC;
margin:5px 0;
padding:4px 10px;
}
.dropdown1 li:hover {
border:1px solid #ccc;
text-decoration:none;
}
.dropdown1 li a:hover {
text-decoration:none;
}
8. Save your template and you are all done!
Add Accordion To Blogger Layout
Now you need to add your widget in the layout section and start making a list of your own popular series or any content that you wish to display inside it.- Go to blogger > Layout
- Click Add a Gadget
- Choose HTML/JavaScript widget
- Paste the following HTML code inside it:
<ul class="container">In the above code I created two tabs with 4 rows each.
<!- TAB ONE -->
<li class="menu">
<ul>
<li class="button"><a href="#" >ADD TAB TITLE HERE<span>▼</span></a></li>
<li class="dropdown1">
<ul>
<li>1. <a href="ADD LINK HERE" >ADD LINK TEXT HERE</a></li>
<li>2. <a href="ADD LINK HERE">ADD LINK TEXT HERE</a></li>
<li>3. <a href="ADD LINK HERE">ADD LINK TEXT HERE</a></li>
<li>5. <a href="ADD LINK HERE">ADD LINK TEXT HERE</a></li>
<li>4. <a href="ADD LINK HERE">ADD LINK TEXT HERE</a></li>
</ul>
</li>
</ul>
</li>
<!- TAB TWO -->
<li class="menu">
<ul>
<li class="button"><a href="#" >ADD TAB TITLE HERE<span>▼</span></a></li>
<li class="dropdown1">
<ul>
<li>1. <a href="ADD LINK HERE" >ADD LINK TEXT HERE</a></li>
<li>2. <a href="ADD LINK HERE">ADD LINK TEXT HERE</a></li>
<li>3. <a href="ADD LINK HERE">ADD LINK TEXT HERE</a></li>
<li>5. <a href="ADD LINK HERE">ADD LINK TEXT HERE</a></li>
<li>4. <a href="ADD LINK HERE">ADD LINK TEXT HERE</a></li>
</ul>
</li>
</ul>
</li>
</ul>
- Replace ADD TAB TITLE HERE with the name of the list title.
- Replace ADD LINK HERE with your Link URL
- Replace ADD LINK TEXT HERE with your anchor text
I don't think the above code needs further clarification. Every part is highlighted to make it more simple to be understood. If incase you wanted to add another tab then just add the following code above </ul>
<li class="menu">To increase the number of rows simply keeping adding this line of code:
<ul>
<li class="button"><a href="#" >ADD TAB TITLE HERE<span>▼</span></a></li>
<li class="dropdown1">
<ul>
<li>1. <a href="ADD LINK HERE" >ADD LINK TEXT HERE</a></li>
</ul>
</li>
</ul>
</li>
<li>1. <a href="ADD LINK HERE" >ADD LINK TEXT HERE</a></li>
- Simply change 1 with the row number.
Visit your blog to see it hanging just nicely on your blog sidebar. Click the tabs and play with your newly created Accordion widget. It's all yours now! :)
Need Help?
Most of your requested this tutorial and it is my habit to share everything that we apply to our blog in order to help you customize your blogs to the bets possible look. Please let me know if you needed any help. I just hope it helps you to effectively organize your blog even more. Peace and blessings dear brothers :)50 Handpicked Blogger Plugins and Widgets!
50 Handpicked Blogger Plugins and Widgets!
 Blogger is emerging as a powerful opponent to rest of the CMS platforms like wordpress and all. MBT has always created and promoted widgets and plugins for sites on blogger. So as a regular MBT reader myself, I have selected some of the best widgets developed so far for BlogSpot blogs, which I believe every blog must have. We are presenting a collection of 50 handpicked most trending plugins and widgets exclusively for blogger. I bet You can't afford to miss this post! ;)
50 Trending Widgets Collection
#1: Fancy Blogger Threaded Commenting System

Ah! I loved this. One of the finest creation of MBT and Mohammad. Threaded comments add breath to your comments which makes it more appealing and gives an easy look who is talking to whom. Shows users and Admin in different highlighted style and contains automatic comment counts also!
Install Now!
Install Now!
#2: Table of Contents

Google is just 50% boss! So, after you have successfully created sitemap for robots, why not create a sliding dropdown sitemap for your users too? Give them user friendly experience while browsing through your site!
Install Now!
#3: Popular Posts with Counter!
Popular posts serve your users best way to navigate through trending articles on your website. And when the widget is styled by MBT, then who dares not to visit your posts? :) Grab this cool widget through the link below!
Install Now!
#4: Contact Form

There you go. A way users can use to contact you without giving out your email id to them. A beautiful contact form is really appreciated. Get going and install this form on your blogger blogs right away...!
Install Now! [Part 1]
Install Now! [Part 2]
#5: Accordion Dropdown Widget

This is also a great invention by MBT. A smooth sliding dropdown widget in your footer will sparkle out your whole site. You can place your own links, categories, or anything you want. Useful for display long list of posts or related articles in series. So, what are you waiting for?
Install Now!
#6: Download Counter
Great plugin for people who are looking to record stats for their downloads. Though you can use some popular sites like box.com or dropbox.com to record your download stats, still, this plugin makes your task easier by letting you know your download stats on the go!
Install Now!
#7: HootSuite For Blogger

The popular app HootSuite is launched for Bloggers. So why are you still here guys? Go on and install this cool and useful application to your site as soon as possible! Follow the link:
Install Now!
#8: AdSense Booster Plugin
A great plugin developed by STC Network which allows adding your adsense ads right after <!---more--> tag in blogger which breaks your content into some part. This plugin will surely boost your CTR earnings!
Install Now!
#9: Post View Counter
The new blogger dashboard already show you post views in the Post section. But this plugin would allow you to show that off to your visitors! A great handy plugin to show off how popular you are!
Install Now!
#10: URL Redirection

Nice plugin to redirect users to a demo site through your links. Give out a professional feeling and view. Must install plugin if you are on blogger and share downloadable resources. This is trick applied by all Blogger/Wordpress Template Sharing sites to let users stay inside the root domain.
Install Now!
#11: Facebook Activity Feed Plugin

Yet another great plugin by MBT to inform your users about recent happenings on Facebook around you. Grab it now.
Install Now!
#12: Blogger Notification Bar

Finest creation by MBT, a great fixed floating notification bar for blogger. I'd love to add this to my site is it was on blogger (but its not!) So, go ahead, and add this one too..
Install Now!
#13: Linkwithin Black Skin Version

Linkwithin is a popular widget through which you can display popular posts in your website. What about sprinkling a little CSS style over it? It will look great!
Install Now!
#14: Google+ Followers Gadget For Blogger

Yet another great discovery by Mohammad. Adding Google+ followers gadget to your site will help you to show off world how popular you are. Go ahead and add this one also.
Install Now!
#15: Archives Calendar

MBT is back with its CSS3 magic to do with your calenders. What can be better than to convert your simple, ugly, dull dropdown archive menu into a stylish, dashing, and cool archivo calender? Go on!
Install Now!
#16: Floating Colorful Navigation Menu

I liked this one too. Lightweight, easy to load, easy to customize, and 100% working. Designed by Mohammad. You should give it a try and I guarantee you won't be disappointed with the results!
Install Now!
#17: Massive Sharing Widget
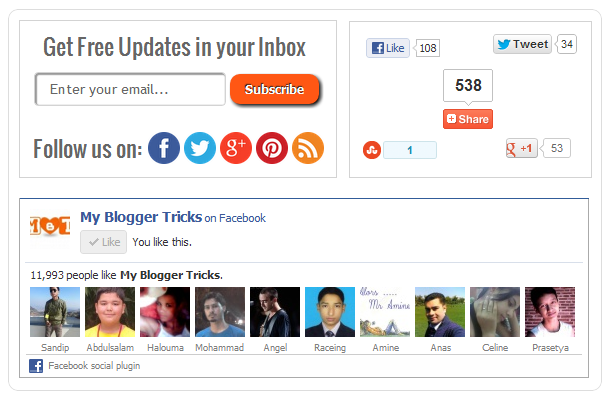
A piece of good work by mohammad. This widget would allow your visitors to share your content to their suitable social profiles as this widget provides a wide range of social profiles. Go now or never!
Install Now!
#18: Beautiful Label Cloud

This post really shows how CSS can change the overall look of any element on a web page. If you are looking for an attractive label/tag collection, go ahead and follow this tutorial.
Install Now!
#19: Facebook Recommendation Box

Officially from facebook, there is no tutorial to add it to blogger, but MBT has converted this for blogger too! Boost your reputation and traffic by getting shared and liked on facebook!
Install Now!
#20: Expand/Collapse Blogger Comment Box

Great jQuery tutorial to save space and give a stunning look to your comments. Add a nice smooth scrolling effects to your default blogger commenting system. Will not work with threaded comments but the default comment style using no nested comments.
Install Now!
#21: Touch Me Sharing Buttons

Sharing buttons for blogger. All icons are created and crafted by MBT
Install Now!
#22: Flipper Sharing Buttons

Sharing buttons for blogger. Uses MBT's flipper Icon Set to force visitors to share your article on popular social media networks.
Install Now!
#23: Floating sharing bar

Awesome floating sharing bar for blogger posts and/or homepage. Install it and see a significant increase in your traffic!
Install Now!
#24: Auto Guest Author Box

Having too much guest authors? Tired of adding links in every post? Try out this automatic author box fix created by MBT:
Install Now!
#25: Multi Level Drop Down Menu

Got lots of stuff on your site? Over spacing? Try this out. So much room in this menu, you'll never find an end!
Install Now!
#26: Collapsible jQuery Sticky Bar

A jQuery based sticky bar for Blogger. Give it a try!
Install Now!
#27: Do You Like This Story?

An old but gold widget by MBT which is to be placed at bottom of the post which requests visitor to like and share the post to promote the site.
Install Now!
#28: Facebook LikeBox jQuery Popup

Notify your visitors that you are available on facebook and request them to share them on their profiles. Add a pop up facebook like box to your blogger blog now!
Install Now!
#29: Blogger Sitemap Generator

Your first PHP Tool Mohammad? Congo! :P Okay. This simplifies the process of searching for your sitemap and submitting it to various search engines. Try it.
Try Now!
#30: Thumbs Up Rating For Blogger!

Let your visitors thumbs up or thumbs down your post! Install a widget which would allow your visitors to leave their views without comments!
Install Now!
#31: Pure CSS3 Drop Down Menu

Looking for elegant dropdown menu but no compromise with site speed? Here's the latest CSS3 technology to help you out!
Install Now!
#32: jQuery Facebook Pop Up Like Box

Add a jQuery Facebook pop up like box to your blogger blog! Used by thousands of mbt readers to this time. Contains a subscription box also.
Install Now!
#33: Sharing Buttons

Show sharing buttons just below all posts titles for blogger.
Install Now!
#34: Floating Facebook Likebox

Add more exposure to your blog. Facebook like box.
Install Now!
#35: Related Posts Slides

Show wordpress like related posts slides on your blogger blog.
Install Now!
#36: Fluid Text Resizer

Add a convinent method for your visitors to zoom in or zoom out the text on your site. Add this widget!
Install Now!
#37: Scrolling Back To Top

Add a smooth scrolling back to top button to your site with smooth jQuery effects.
Install Now!
#38: Image Gallery For Blogger

Add a good, small, lightweight image gallery to your site with some great controls such as Pause/play.
Install Now!
#39: Custom Flash Movie Play

Kick out YouTube player and add your very own flash player to your website (blogger blog)
Install Now!
#40: MP3 Player

Create your own MP3 Player for your blog! Great one!
Install Now!
#41: Syntax Highlighter

Add a stunning syntax highlighter to your blogger blog. Adapted from wordpress versions.
Install Now!
#42: jQuery Image Slider For Blogger

Add a beautiful jQuery image slider for your blog. Easily editable and highly user friendly.
Install Now!
#43: PayPal Donate Button

Add a stunning paypal donate button with some spicy text below each posts so that you can pay your hosting bills!
Install Now!
#44: Random Ad Banners

Space low for advertisements? Install a random ad banner and display any ad anytime! The ads will auto rotate on page refresh.
Install Now!
#45: Beautiful Footer

Add an awesome 3 column footer to your blogger blog. Must have footer!
Install Now!
#46: Multi-Tab Widget

Add a full customization ready multi tab widget to your blogger blog to impress each and every visitor visiting your blog!
Install Now!
#47: Feedback Buttons

Add cool floating feedback widget to your website to know what your visitors think about you!
Install Now!
#48: Flying Twitter Bird

Add a cute flying twitter bird on your blogger blog!
Install Now!
#49: Zemanta For Blogger
Install this popular software on your blogger blog and experience a new way to write posts! However Mohammad recently explained 6 SEO drawbacks of this plugin which you must read also before using it.
Install Now!
#50: Pin It Button

Add a pinterest Pin It counter button to your blog! Must try widget! :)
Install Now
Your Views?
We shared some cool widgets developed by MBT. I hope you find this listing useful. If I have missed mentioning any MBT widget, please do remind us by leaving your precious comments. And don't forget to share this post with your friends to let everyone benefit form these free resources. Good day!Guest Post by Mehul Mohan, a loyal reader and contributor of MBT blog. Mehul loves sharing articles on Wordpress, blogger and SEO. You can follow him via his blog MyPremiumTricks


